Battery switch on travel trailer function is crucial for managing your RV’s power. Understanding how these switches work – whether single-pole, double-pole, or double-pole double-throw – is key to safe and efficient power usage. This guide will walk you through different switch types, safe connection and disconnection procedures, troubleshooting common problems, and integrating your battery switch with other electrical systems in your travel trailer.
We’ll cover everything from selecting the right switch to proper installation, ensuring you’re equipped to handle your RV’s power needs with confidence.
We’ll delve into the specifics of wiring dual-battery setups, grounding your system correctly, and preventing issues like corrosion. Understanding the interplay between your battery switch, solar panels, converter, and inverter is essential for maximizing your power efficiency and minimizing potential problems. We’ll also compare battery switches to other power management systems, helping you make informed decisions about your RV’s electrical setup.
Connecting and Disconnecting Batteries: Battery Switch On Travel Trailer Function
Properly connecting and disconnecting your travel trailer batteries is crucial for safety and to ensure the longevity of your battery system. A battery switch allows you to isolate batteries for maintenance or to prevent accidental drain. This section details the safe procedures and wiring configurations for a dual-battery setup.
Before you begin any work on your battery system, always disconnect the negative (-) terminal first. This helps prevent accidental shorts and protects you from electrical shocks. Remember to wear appropriate safety glasses and gloves.
Safe Battery Connection and Disconnection Procedure, Battery switch on travel trailer function
The following steps Artikel the safe procedure for connecting and disconnecting batteries using a battery switch. Following these steps meticulously will minimize the risk of accidents and damage.
- Turn off all loads: Before working on the batteries, ensure that all appliances and electronics connected to the battery system are switched off.
- Locate the battery switch: Identify the location of your battery switch. It’s usually located near the batteries themselves.
- Disconnect the negative (-) terminal: Using a wrench, carefully loosen and remove the negative (-) cable from the battery you are disconnecting. Always disconnect the negative terminal first.
- Disconnect the positive (+) terminal: Once the negative terminal is disconnected, loosen and remove the positive (+) cable from the battery.
- Connect the positive (+) terminal: When connecting, reverse the process. Connect the positive (+) cable first.
- Connect the negative (-) terminal: Finally, connect the negative (-) cable.
- Verify connections: After connecting, visually inspect all connections to ensure they are secure and properly tightened.
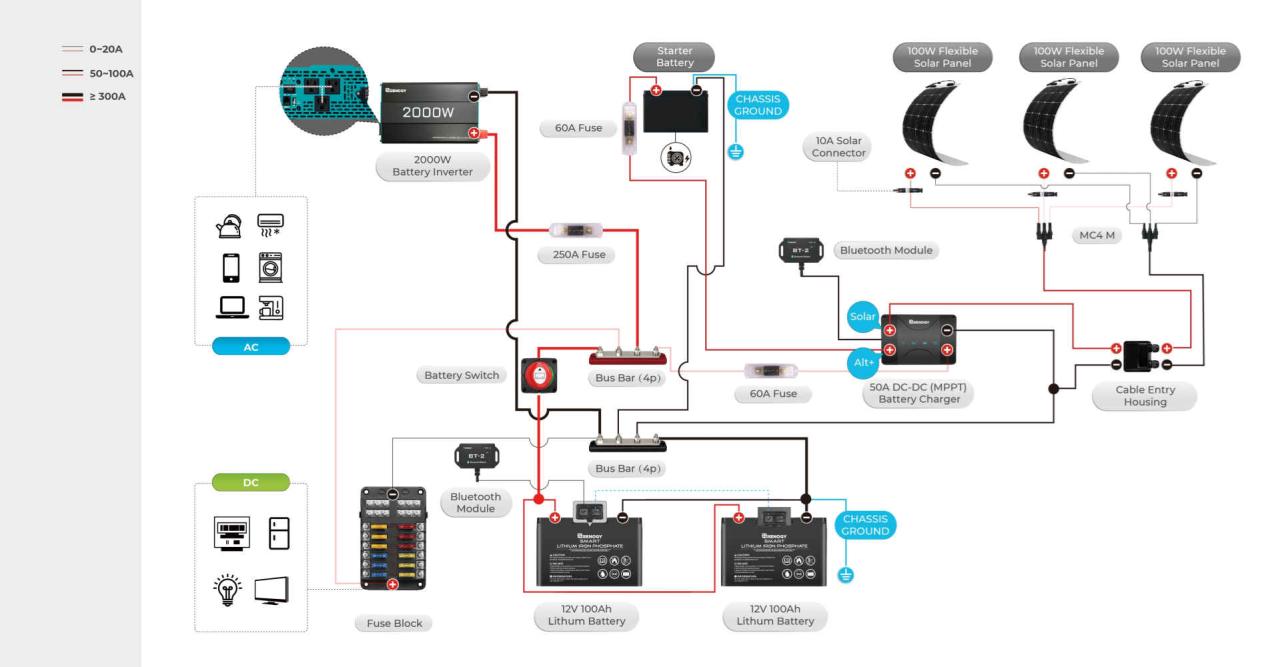
Dual-Battery Wiring Configuration
A common setup involves two batteries connected to a battery switch, allowing you to select which battery (or both) powers your trailer’s systems. One battery typically serves as the “house” battery, powering lights and appliances, while the other serves as the “starting” battery for the tow vehicle. The switch controls which battery, or combination of batteries, powers the trailer’s loads.
Improper wiring can lead to system failures or damage to your batteries.
So, you’re an audiophile who travels? Awesome! Check out this guide on building an audiophile travel setup for killer sound on the go. It covers portable DACs and headphones. But what if you need something even more compact? Then you’ll want to look at the tips and tricks for a seriously mini audiophile travel setup , focusing on space-saving solutions and high-quality sound in small packages.
Seriously, these resources will change your travel listening game.
| Component | Terminal | Connection |
|---|---|---|
| Battery 1 (House) | Positive (+) | Battery Switch Terminal 1 (+) |
| Battery 1 (House) | Negative (-) | Ground Bus/Chassis |
| Battery 2 (Starting) | Positive (+) | Battery Switch Terminal 2 (+) |
| Battery 2 (Starting) | Negative (-) | Ground Bus/Chassis |
| Battery Switch | Terminal 1 (+) | Battery 1 (+) |
| Battery Switch | Terminal 2 (+) | Battery 2 (+) |
| Battery Switch | Load Terminal (+) | Trailer Load (+) |
| Trailer Load | Negative (-) | Ground Bus/Chassis |
Grounding the Battery System
Proper grounding is essential for a safe and reliable battery system. A good ground provides a low-resistance path for current to flow back to the batteries, preventing voltage drops and protecting against electrical damage. In a travel trailer, this often involves connecting the negative (-) terminals of both batteries to a common ground point, usually a ground bus bar securely fastened to the trailer’s chassis.
A poorly grounded system can lead to erratic electrical performance, corrosion, and even fire hazards. Ensure that all ground connections are clean, tight, and corrosion-free. Using anti-corrosion grease on the connections is recommended.
Troubleshooting Battery Switch Issues
Your travel trailer’s battery switch is a crucial component, ensuring power flows correctly to your house batteries and ensuring you can switch between shore power and battery power. Problems with this switch can leave you without power when you need it most. Understanding common issues and how to troubleshoot them will save you time and frustration.
So, you’re an audiophile who travels? Awesome! Check out this guide on building the perfect audiophile travel setup for amazing sound on the go. It covers everything from portable DACs to noise-cancelling headphones. Then, for a different perspective on compact high-fidelity audio, explore this other resource on audiophile travel setups , focusing on minimizing size without sacrificing quality.
These resources will help you find the perfect balance between portability and pristine audio quality, no matter where your adventures take you.
Battery switch problems usually stem from a few key areas: corrosion, loose connections, or switch failure itself. Corrosion builds up over time, hindering electrical conductivity. Loose connections, often caused by vibration during travel, create intermittent power or complete outages. Finally, the switch itself can fail due to age, wear, and tear, or exposure to the elements.
Common Battery Switch Problems
Let’s look at the most frequent culprits behind a malfunctioning battery switch. Identifying the problem is the first step to fixing it.
- Corrosion: Sulfate buildup on the terminals and switch contacts is a common problem, especially in humid climates. This creates a high-resistance path, leading to weak power or no power at all. You’ll often see a white, powdery substance or greenish discoloration around the terminals.
- Loose Connections: Vibrations from towing can loosen the connections at the battery terminals, the switch itself, or even at the wiring connections. This results in intermittent power or complete failure.
- Switch Failure: The switch itself can fail due to mechanical wear or internal component failure. This might manifest as the switch not clicking into place, or not providing power even when properly engaged. Sometimes, the internal contacts might be worn or damaged, preventing proper electrical contact.
Troubleshooting Flowchart
This flowchart will guide you through systematically diagnosing your battery switch problems. Remember to always disconnect the negative battery terminal before working on any electrical components.
- Check the Battery Switch Position: Is the switch correctly set to the desired position (battery, shore power, both, or off)? If not, adjust it and test.
- Inspect for Corrosion: Carefully examine the battery terminals, the switch contacts, and all wiring connections for corrosion. Clean any corrosion using a wire brush and baking soda solution.
- Check for Loose Connections: Tighten all connections at the battery terminals, the switch, and any wiring. Ensure all connections are secure and snug.
- Test the Switch: With all connections secure and clean, test the switch functionality. Does power flow correctly when the switch is engaged? If not, the switch may be faulty.
- Check the Circuit Breaker/Fuse: If the switch seems fine, ensure the circuit breaker or fuse related to the battery switch hasn’t tripped or blown.
Preventing Battery Switch Issues
Regular maintenance is key to preventing problems with your battery switch. A little preventative care goes a long way in ensuring reliable power.
- Regular Cleaning: Clean battery terminals and switch contacts at least twice a year, or more often in humid environments. Use a wire brush and baking soda paste to remove corrosion.
- Tighten Connections: Periodically check and tighten all connections at the battery terminals and the switch. This prevents loose connections caused by vibration.
- Protective Coating: Apply a dielectric grease or terminal protector to the cleaned battery terminals and switch contacts to prevent future corrosion.
- Inspect Wiring: Regularly inspect all wiring for damage or fraying. Replace any damaged wiring immediately.
Battery Switch Selection and Installation

Choosing and installing the right battery switch is crucial for safely managing your travel trailer’s power. A properly selected and installed switch ensures reliable power distribution and protects your batteries and other electrical components from damage. This section will guide you through selecting the appropriate switch and installing it correctly.
Selecting the Appropriate Battery Switch
Several factors influence the selection of a suitable battery switch for your travel trailer. These include the size and type of your batteries, the amperage draw of your appliances, and the overall electrical system design. Ignoring these factors can lead to an undersized switch, resulting in overheating and potential fire hazards, or an oversized switch, which is unnecessary and costly.
- Battery Size and Type: Determine the total amperage-hour (Ah) rating of your batteries. Larger batteries require switches with higher amperage ratings. The type of battery (flooded lead-acid, AGM, lithium) can also influence the choice, as some battery types are more sensitive to voltage spikes.
- Amperage Requirements: Calculate the total amperage draw of all appliances and systems connected to your battery bank. Add a safety margin of at least 20% to account for peak loads and future additions. This ensures your switch can handle the maximum current demand.
- Switch Type: Consider a standard battery switch or a more advanced system like a battery combiner/isolator or a smart battery switch. Standard switches offer simple on/off control, while combiners allow for combining batteries for charging or parallel operation. Smart switches offer additional features like automatic charging control and monitoring.
- Mounting Location: Select a location that is easily accessible, well-ventilated, and protected from the elements. Avoid locations subject to excessive heat or moisture.
Installing the Battery Switch
Proper installation is critical for safety and optimal performance. Use the correct wiring gauge and always install fuses or circuit breakers to protect your system. Failure to follow these steps can lead to electrical fires or damage to your equipment.
- Gather Materials: You’ll need the battery switch, appropriate gauge wiring, ring terminals, fuses or circuit breakers, heat shrink tubing, and mounting hardware.
- Wiring Gauge Selection: Choose wiring that matches or exceeds the amperage rating of the switch and the maximum current draw of your system. Consult a wiring gauge chart to determine the appropriate wire size for your application. For example, a 100-amp switch would typically require at least 4 AWG wire.
- Fuse or Circuit Breaker Placement: Install a fuse or circuit breaker in the positive (+) wire leading to the switch. This protects the switch and the entire wiring system from overloads. The fuse or circuit breaker rating should match or slightly exceed the switch’s rating.
- Wiring Connections: Securely connect the wires to the switch using appropriately sized ring terminals. Ensure all connections are tight and corrosion-resistant. Use heat shrink tubing to protect the connections from moisture and abrasion.
- Mounting the Switch: Mount the switch in the chosen location, ensuring it is securely fastened and accessible.
- Testing: After installation, thoroughly test the switch to ensure it operates correctly and all connections are secure. Verify that the fuses or circuit breakers are functioning properly.
Importance of Fuses and Circuit Breakers
Fuses and circuit breakers are essential safety devices that protect your electrical system from overloads and short circuits. They act as sacrificial devices, interrupting the current flow before it can damage components or cause a fire. A properly sized fuse or circuit breaker will melt or trip, interrupting the circuit, preventing damage.
Always use fuses or circuit breakers with a rating that matches the amperage rating of the wiring and the switch. Never replace a blown fuse or tripped breaker with a higher-rated one. This is a common mistake that can lead to serious consequences.
Mastering your travel trailer’s battery switch is essential for reliable power on the road. By understanding the different switch types, safe operating procedures, and common troubleshooting techniques, you’ll be prepared to handle any electrical situation. Remember, proper maintenance, including regular cleaning and inspections, will prevent many common problems and ensure a smooth and enjoyable camping experience. So, take the time to learn about your battery switch; it’s a small investment that yields big rewards in peace of mind and reliable power wherever your adventures take you.
FAQ Explained
What size fuse should I use with my battery switch?
The correct fuse size depends on the amperage rating of your battery switch and the wiring. Always consult the manufacturer’s specifications for your specific switch and wiring.
How often should I clean my battery switch?
Inspect your battery switch at least once a year and clean it as needed, especially if you notice corrosion or buildup. More frequent cleaning is recommended in harsh environments.
What happens if my battery switch fails?
A failed battery switch can prevent you from accessing power from your batteries. This could leave you without lights, appliances, or the ability to start your RV.
Can I use a battery switch with lithium batteries?
Some battery switches are compatible with lithium batteries, but it’s crucial to check the manufacturer’s specifications to ensure compatibility and safety. Improper use can lead to damage or fire.
